Access all In Easy Steps books for just £5 a month
Menu
The operating system used by the Raspberry Pi can be one of several specially optimized versions of the Linux operating system. These are known as “distributions”, or “distros” for short. Each available distro is offered as a disk image which must be written onto the Micro SD card to be inserted into the Raspberry Pi. The choice of currently available distros are listed for free download at raspberrypi.org/downloads
At the time of writing, the list includes these distros:
• Raspbian – recommended for beginners, this distro provides a comprehensive system with a graphical desktop, web browser, and development tools to get you started programming.• Ubuntu MATE – regular Ubuntu desktop distro optimized for Raspberry Pi 2 and Raspberry Pi 3.

• OSMC – Open Source Media Center that allows media playback from your local network, attached storage, or the web.
• OpenELEC – embedded operating system that provides an open source media hub.
• PiNet – classroom operating system that provides centralized student accounts and file storage.
• RISC OS – non-Linux alternative operating system.
• Windows10 IoT – Microsoft system for Core devices.
Formatting the SD card
It is recommended that you format the Micro SD card before writing any distro onto the card to ensure best performance:
Step 1
Visit sdcard.org/downloads/formatter_4 to download a free SD Formatter for Windows or Mac
Step 2
Follow the instructions to install the SD Formatter, then insert your Micro SD card into your card reader and make a note of the drive letter allocated to it, e.g. E:/
Step 3
Run SD Formatter then select the drive letter of your Micro SD card and format the card

The Micro SD card should be at least 8GB capacity and at least Class 4 speed.
Installing the Raspbian operating system
This book demonstrates the officially recommended Raspbian distro that can be written onto your Micro SD card using the “NOOBS” (New Out Of the Box Software) easy installer.

Step 1
Go to raspberrypi.org/downloads/noobs and click the Download ZIP button to download the installer

Step 2
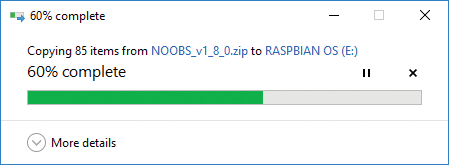
Extract all contents in the downloaded ZIP file to your Micro SD card to copy the installer

Step 3
Remove the Micro SD card from the card reader and insert it into your Raspberry Pi
Step 4
Plug in your keyboard, mouse and monitor cables
Step 5
Now, plug in the USB power cable to your Raspberry Pi to see it boot to a window offering a list of operating systems you can install
Step 6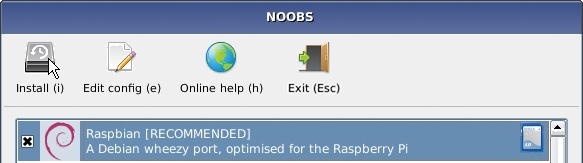
Check the box next to the “Raspbian” option, then click the Install button to install the operating system
Step 7
When the installation process has completed, you can turn the power off, then back on, to start the operating system
For the complete Raspberry Pi 3 guide, all in the trusted In Easy Steps style, click here. In full-colour and straightforward, jargon-free language, Raspberry Pi 3 in Easy Steps enables complete beginners to create their very own computer programs with the Scratch visual programming environment.
It also instructs programming in the high-level (human-readable) Python programming language, which is processed by the Python ‘interpreter’ to produce results fast.
